How to Make a Quote Sign in Any Size, and Any Surface
This post contains affiliate links.
I love making large quote signs for parties and home decor. Large signage is an easy and inexpensive way to cover a large area and make a statement piece. So today, I want to share how to make a quote sign in any size and any surface.
The technique I use works on any surface, but my favorite material to make a quote sign is canvas fabric. Canvas fabric is inexpensive, looks pretty, is lightweight, and can be stored easily. I love it! Below are some ways to make your own;
Make this quote sign
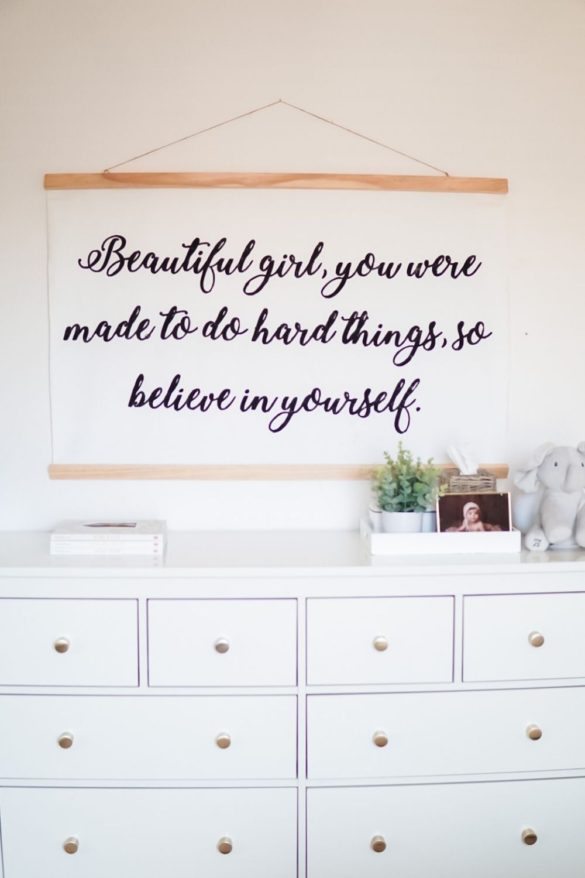
I saw this quote, and I fell in love with the message, so I decided to make a large sign to hang in my daughter’s room. I am super happy with the way it came out. My little one continually asks me to read it to her.
Prepare wood. Choose a straight plank. To help your sign last longer, apply a layer of wood conditioner. After the conditioner dries, you can use a wood stain. I like the light and natural colors.
Print template. This sign is large (2 ft. by 4 ft.), choose the poster size option to print. Arrange the pages and use tape to create a large puzzle. Use a craft knife to trace the letters, but leave the inside of the letters in (see the picture below).
Cut your fabric 3 to 4 inches wider than the wood stud on all around. Fold the sides of the fabric and iron or sew.
Attach the wood to the canvas |center the wood on the fabric, and use a staple gun to attach the cloth to the top (the 4 ft. wide side). Staple behind, leave the wood exposed.
Center the poster stencil on top of the canvas and cut any extra fabric at the bottom.
To paint, place the paper stencil you created on top of the canvas and use a foam brush to paint. Don’t stroke the paintbrush. You want to tap the paint up and down to avoid moving the stencil.
Once you paint the quote, remove the paper stencil immediately, you don’t want it to dry and adhere to the fabric, then let it dry completely.
Then, staple the second piece of wood to the bottom of the sign.
Finally, attach the eye-hooks on the top and use twine string to hang it.
How to make stencils
Once you create a stencil, you can transfer it to any surface. Use canvas, wood, poster paper, or cardboard. How you paint the letter depends on the surface. I use acrylic paint, chalk markers, or Cricut vinyl. Below are some ways to make your own;
Publisher | I use Microsoft Publisher to create large templates. I choose the create new page size option to customize the size.
Cricut | I also use my Cricut machine to create stencils. Choose bold letters to make the perfect sign. Here is how.
Surfaces and paint
Fabric | as I said, this is my favorite surface to make signs. I use canvas because it is thick, inexpensive, lightweight, and easy to store. As long as you tap the acrylic paint on, you will not have issues with smudges. If you make the stencils with Cricut vinyl, then you can reuse the fabric as many times as you like.
Wood | I use wood for smaller signs. Before you paint your letter sign, paint the wood with chalkboard paint or stain it. To paint letters on, use Cricut vinyl, Chalk markers, or acrylic paint.